![]()
Author(s):
CoralCMD is a multi-user, timesharing system. In the modern age, these are often referred to as “pubnix” (for PUBlic uNIX) or “tilde” systems. These systems are services, where users may log in as a user, usually via a Unix shell over SSH (or, in less common cases, unencrypted telnet or rlogin). CoralCMD runs OmniOS, a distribution based on the Illumos operating system, which is actively developed as a fork of the now-defunct OpenSolaris OS/NET source code.
On CoralCMD, we host several services for users to freely access.
ssh command pre-installed. Earlier versions of Windows do not have an SSH client; in this case we recommend PuTTY.dinit service supervision suite.dinit.To sign up, view this page.
An administrator should have given you a password with your account upon creation.
To begin, type into your terminal prompt the following SSH command, replacing your username with the username you are using.
ssh yourusername@coralcmd.net
Next, you will be prompted to accept the identification key of the server. This should only happen once or twice (once for IPv4, once for IPv6) out of all the times you’ll ever log in, as this key doesn’t change unless specified by announcement.
The authenticity of host 'coralcmd.net (2607:5300:203:18cd::1)' can't be established.
ECDSA key fingerprint is SHA256:YSp5xoDW4wKBDqN3B/MgWL1lR1wrloT6aQBW7bJx8VE.
Are you sure you want to continue connecting (yes/no)?
Type yes and hit enter.
Warning: Permanently added 'coralcmd.net,2607:5300:203:18cd::1' (ECDSA) to the list of known hosts.
Next, you’ll be prompted for your password. If this is your first login, use the password provided by an admin:
Password:
Then hit enter, and you’ll be logged in!
The initial screen for PuTTY should provide you with a place to input the username and hostname, like so:
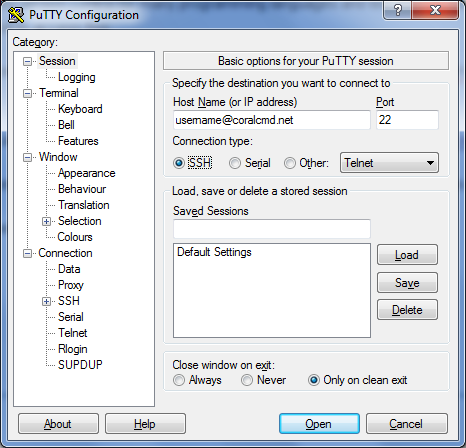
Leave the port as default, and set Host Name to yourusername@coralcmd.net.
You will get a security alert on the first connection; just click Accept:
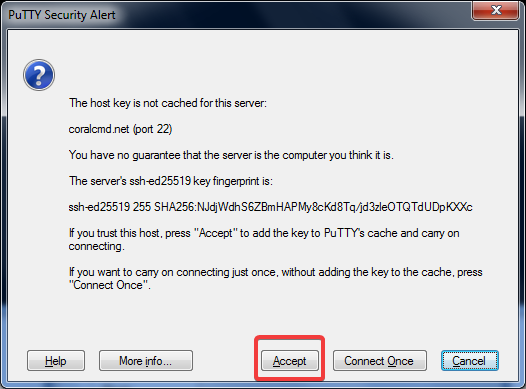
Afterwards, you will be prompted for your password, type it in and you will be logged in.
To change your password, type chpass at the shell, then type your new password twice, then your old one. Example:
$ chpass
New password:
Re-enter new password:
Enter LDAP Password:
Changes may take up to 10 minutes to take effect.
To change the default text editor and timezone, you may edit the $HOME/.profile file (ex. if you want to edit with the nano editor (easiest option) you would type nano $HOME/.profile.) and then add the following two lines of text:
export EDITOR=nano # or whatever editor you pick; ed, vi/ex, vim/nvim, emacs, and others are also available.
export TZ='Australia/Perth' # or whatever your closest TZ code is.
For a list of valid timezones, see this Wikipedia link and look in the “TZ identifier” column.
Afterwards, make sure to enter the command to re-load the newly applied settings:
. $HOME/.profile
Changing your user information is pretty simple. Type chuser and enter your password; it will open the EDITOR you picked earlier. The following fields are available for changing:
| Field | Description |
|---|---|
cn |
Common Name, this can be whatever display name you wish. Multiple can be specified. |
sn |
Surname. This is your last name; if you do not wish to provide this, put LNU. |
homePhone |
Not necessary, if you don’t want this just put 1. |
mail |
Your email, put yourusername@coralcmd.net. |
description |
A description of yourself. |
geeks |
This is the display name that shows on some command-line applications and the web directory index. |
loginShell |
The absolute path to your UNIX login shell. By default this is /bin/bash (GNU Bourne-Again Shell), but there are several other options, including (but not limited to) the Z Shell /bin/zsh, the Berkeley C Shell /bin/csh, the Korn Shell /bin/ksh, and the Tenex C Shell /opt/local/bin/tcsh. |
Now with that out of the way, we’ll assume you know the basics of a Unix(-like) system. Some examples would be most conventional Linux distributions, or the BSDs such as FreeBSD or OpenBSD.
However, we use Illumos, which is derived from Solaris, so the kernel (SunOS) and the user land (UNIX System V) are a bit different from the BSDs and Linux. Be not afraid! The commands are mostly the same, with some minor differences; there is much documentation for you to consult if in doubt.
There are a few ways to read documentation on the system. Two ways to read the “man” (Manual) pages for commands, libraries, and miscellanea is to use the man command:
man ls
This will show you the manual page for the ls command.
There is a catch though; if you don’t specify the manual section at the end, it will only show the first result.
This can be solved by one of three ways.
The first method is appending the section to the end of the page name.
For example, if you want to see the manual for the passwd file-format, you’d type man passwd.5 because otherwise the system would show you information for the (now-deprecated) passwd command from section 1.
(Pro-tip: the BSD-style syntax of typing man 5 passwd to get to section 5 for the page passed does not work on CoralCMD. Use man passwd.5 instead.)
But what if you don’t know which section the page is in?
You may either search through the manual database with a keyword search, via the apropos command:
apropos passed
Which will provide output similar to the following:
[...]
getpw(3c)                - get passwd entry from UID
kpasswd(1)               - change a user's Kerberos password
openssl-passwd(1ossl)    - compute password hashes
pam_passwd_auth(7)       - authentication module for password
pam_smb_passwd(7)        - SMB password management module
passwd(1)                - change login password and password attributes
passwd(5)                - password file
[...]
Or you may simply use man -a to show every match:
man -a passwd
You may also view most (but not all) of the manuals on man.omnios.org.
NOTE: You can also get an email containing a PDF version of the manpage! Type man -t man
to get the man page for man(1) e-mailed to you!
To view the full filesystem path to a command, type:
which command-name
Which provides an output like:
$ which ls
/usr/bin/ls
But what if there’s multiple versions of the same command, some of which have different behavior or functionality?
You can use the -a flag to list all results from which, like so:
$ which -a sum
/usr/bin/sum
/usr/ucb/sum
/usr/gnu/bin/sum
/opt/local/bin/sum
In this case, /usr/bin/sum corresponds to the (SVR4/AT&T-style) checksum utility described in sum(1), while /usr/ucb/sum corresponds to the (BSD/UC Berkeley-style) utility described in sum(1b), among other commands sharing the same short name.
To see how much disk space you have used up, and how much you have total, use the quota -v command. Example output for user operz:
$ quota -v
Disk quotas for operz (uid 10001):
Filesystem     usage  quota  limit    timeleft  files  quota  limit    timeleft
/home/operz  18968922 41943040 41943040           -      -      -      -           -
The default SVR4-style commands are located under /usr/bin and /usr/sbin, and the BSD-style commands are located under /usr/ucb. The BSD-style commands are appended near the end of all users’ PATHs, for accessibility of commands that SVR4’s style does not offer. pkgsrc’s supplementary software commands are located under /opt/local/bin, and includes many programs, including TeXlive and ImageMagick.
lp Print SystemUsing the lp (System V) or lpr (Berkeley) print commands, you may “print” plain text, PostScript, or PDF documents and have them sent to your inbox as a PDF document.
These commands can print from both files and standard input (stdin):
# using the Berkeley syntax to print a file
lpr /etc/motd
# using the System V syntax to print the output of lptest
lptest | lp
Both should be converted to a PDF and sent to your inbox within 60-90 seconds of execution. If this does not happen in a maximum of 5 minutes of delay, then contact an administrator.
Each user has their own website, located publicly at http://username.coralcmd.net/, and locally accessible on the filesystem under ~/public_html.
By default, every 10 minutes, permissions for the web directory are reset to a sane default to prevent issues with the web server accessing the files.
Note that, unless the user specifies that the website is secure-only in a .htaccess file, the website will be accessible via both HTTP and HTTPS.
Placing a file named .htaccess in your public HTML directory or any subdirectory will have the web server parse it for different directives, including (but not limited to) password protection, file and directory permissions, and SSL/TLS enforcement.
An example of forcing HTTPS on a directory or entire site (depending on where the .htaccess file is located) is below:
RewriteEngine On
RewriteCond %{HTTPS} off
RewriteRule (.*) https://%{HTTP_HOST}%{REQUEST_URI} [R=301,L]
This document will not go into the actual programming aspect of CGI, however the way you may set it up is via an executable file ending with the extension .cgi. Once that file is created, the standard output must conform to the CGI standard, which, essentially, is just a glorified HTTP protocol output. The actual executable file format can be one of two types:
As mentioned before, the full system path to an executable binary can be found via the command which. An example for a bash script is shown below:
#!/usr/bin/bash
printf "Status: 200 OK\r\n"
printf "Content-Type: text/plain\r\n"
printf "\r\n"
printf "hello world\r\n"
Notice that according to the CGI and HTTP standards, each line must end with both a carriage return and line feed character (CRLF).
If you don’t want to use CGI but still want dynamic content, it’s possible you may use the dinit service supervisor to host a small web server you write yourself, and then use a .htaccess file to reverse-proxy a path to the IP (usually localhost) and the port the server is listening on.
CoralCMD provides all users with a @CoralCMD.net email address.
There are 3 main ways to access your email: Via a network client, from the command-line, or via webmail in your browser.
There are a few email clients installed that you may use on the command-line. Three notable ones are the venerable mutt, UW alpine, and the nmh message-handling suite.
For Alpine specifically, if you are using it remotely (i.e. on your own computer, not on CoralCMD) you’ll want to set your config to point to these servers:
IMAP: {coralcmd.net:993/ssl/user=myusername/auth=plain}INBOX
SMTP: coralcmd.net:587/tls/user=myusername/auth=plain
While we can’t document every email client in the world, there are a few notable ones like Mozilla Thunderbird or Microsoft Outlook, which are popular.
Some generic settings that are known to be good on almost all clients (IMAP is preferred over POP3):
| Protocol | Port | Encryption Type | Authentication Type |
|---|---|---|---|
| IMAP | 993 | SSL/TLS (Implicit Encryption) | PLAIN AUTH |
| IMAP (Insecure) | 143 | NONE | PLAIN AUTH (ONLY USE IF NESSECARY) |
| POP3 | 995 | SSL/TLS (Implicit Encryption) | PLAIN AUTH |
| POP3 (Insecure) | 110 | NONE | PLAIN AUTH (ONLY USE IF NESSECARY) |
| SMTP | 587 | STARTTLS (Explicit Encryption) | PLAIN AUTH |
| SMTP (Insecure) | 587 | NONE | PLAIN AUTH |
You may access our webmail from most secure web browsers. We use the SquirrelMail webmail software, located at mail.coralcmd.net.
Forwarding your mail can be done using a file name ~/.forward; this file can be used to save mail to a file (spool), sending the email as input to a command, forwarding to another email address, or all of the above.
Example for receiving to your user while also forwarding to a user at another site:
\cooluser01, username02@coolmail.com
For more information, see the manual page forward(5).
.forward and vacation for out-of-office noticesTo initialize the vacation system for the first time, type vacation with no arguments. Your default editor will open; save and quit the file once you are done with the changes to the automated message. Afterwards, you will be asked some questions.
A sample output is like so:
You have a message file in /home/js/.vacation.msg.
Would you like to see it? n
Would you like to edit it? n
To enable the vacation feature a ".forward" file is created.
Would you like to enable the vacation feature? y
Vacation feature ENABLED. Please remember to turn it off when
you get back from vacation. Bon voyage.
To view the database of who has sent you messages, type vacation -l.
To re-initialize the database, type vacation -I.
If you’d like to stop the vacation messages, type vacation again and follow the prompts:
[...]
You have a .forward file in your home directory containing:
    \js, "|/usr/bin/vacation js"
Would you like to remove it and disable the vacation feature? y
Back to normal reception of mail.
For more information, see vacation(1) in the manual.
calendar Reminder ServiceThe calendar command and file format can be used to set up a reminder service. If you put one or more dates and descriptions in $HOME/calendar, the calendar reminder service will send you an email at midnight UTC the night before and the day of the event.
An example line for the 17th of December can be seen here:
12/31 New Year's Eve
umask CommandThe umask command is used to automatically set the chmod permission bits (which is three-to-four columns, with each value ranging from numbers 0 to 7) in either your current session, or, if you add it to your startup shell script, all sessions.
umask uses a mask to set its values, i.e. it uses subtraction from the highest down, so, to set chmod 755, you would run umask 022.
This is useful in case you want to change the default permissions for which you create files.
By default your home directory and most (but not all, as some programs automatically restrict access to sensitive data such as mailboxes and SSH keys) files are world-readable, meaning any
logged-in user on the system may view those files. If you do not like this, you may run the following commands:
find "$HOME" -type d -exec chmod 700 {} ;
find "$HOME" -type f -perm /111 -exec chmod 700 {} ;
find "$HOME" -type f ! -perm /111 -exec chmod 600 {} ;
And don’t forget to add the appropriate umask to your ~/.profile startup cript:
umask 0077
In most POSIX-conformant filesystems, you have your standard Unix-style permissions, modified with the chmod command. Usually this is in the syntax of something like chmod ug+rwx filename.ext.
In ZFS, our filesystem of choice, we use NFSv4 extended ACLs as a way to supplement the existing POSIX-style ACLs with richer semantics, finer-grained access control and inheritance settings.
To use these extended ACLs, you may use the chmod command, but where the octal bits or symbolic letters appear, you create a long string of letters prefixed with A+, A-, or A=. An example would be:
chmod -R A+user:myusername:full_set:fd:allow file-or-directory-name
This gives a user full control in an ACE to not only read, write, execute, etc, but also to modify the ACLs to add more users or groups. You may also specify the symbolic letters by hand, as described in chmod(1).
Below is an example of listing the ACLs on a file where users europa and xm have full access:
xm@coralcmd.net:…hare/acl-testing/europaTestDir$ ls -V
total 1
-rwxr--r--+  1 europa   other        0  May 25 20:15  europaTest
             user:europa:rwxpdDaARWc--s:------I:allow
                 user:xm:rwxpdDaARWc--s:------I:allow
                  owner@:rwxpdDaARWc--s:------I:allow
                  owner@:rw-p--aARWcCos:-------:allow
                  group@:r-----a-R-c--s:-------:allow
               everyone@:r-----a-R-c--s:-------:allow
More info on how to work with extended ACLs (specifically NFSv4/ZFS style) may be found at the manual page for chmod(1).
Some commands allow you to view who else is logged into the system, and sometimes what they are doing. Some examples are w, who, and whodo.
You can also view the last login times of people, with last.
(Psst! This is why you should not specify passwords as command arguments!)
In most interactive shells, you can use the keybind Ctrl-Z to suspend a command that is currently running. You can then use job control commands like fg and bg to resume to the foreground or send to the background of the shell, respectively. The jobs command can view what jobs are running in the shell.
The ps command will by default show only the processes of the current session. Different flags passed to the command will change the listing and/or behavior.
The kill command can be used to send signals (See signal.h(3head) for a list) telling a command what to do, including if the command should terminate or if the kernel should kill the process immediately.
The pgrep and pkill commands work by using a regular-expression to determine which PID(s) to print to the terminal or send a signal to. Beware of the risks of killing the wrong process.
See the manual pages of these commands for details.
dinit)For managing background services as a user, dinit has been added to the system. On boot, all interactive users (that means you, too!) have a process started which allows services to be run in the background. If you would like to run a process in the background 24/7, such as a network listener or an unprivileged daemon, you may do so by creating a service descriptor, like so, inside ~/.config/dinit.d/servicename:
type = process
command = /path/to/executable --arguments one two etc
restart = true
Then, you may enable the service and start it by running:
ln -s ~/.config/dinit.d/servicename ~/.config/dinit.d/boot.d/servicename
dinitctl start servicename
You may check the status of services by running dinitctl list. More information may be found in the manual pages for dinit, dinitctl, and at the dinit homepage at Davmac.org.
ZFS is our filesystem of choice. We have set up delegated permissions which allow users to create sub-filesystems of their home directories, as well as set certain options and create snapshots.
List of allowed subcommands:
List of allowed properties for creation-time:
To create a snapshot of your home directory before a potential disaster, type:
zfs snapshot rpool/home/$USER@nameofsnapshot
Note that you need to add -r after the word snapshot if you’d like it to recurse to child-filesystems.
To create a case-insensitive dataset named testing under your home directory, the following will suffice:
zfs create -o casesensitivity=insensitive rpool/home/$USER/testing
To leave the case-sensitivity as the default, just remove the -o casesensitivity=insensitive.
You may also use the zfs destroy command on the same rpool/... dataset, but beware as this makes your data go poof.
As an alternative to using passwords every time or SSH keys, you may also use Kerberos V tickets.
To change the Kerberos password which you use to request a ticket, you should use the kpasswd command, like so:
$ kpasswd
kpasswd: Changing password for operz.
Old password:
New password:
New password (again):
Kerberos password changed.
If you don’t know what the old password is, ask an admin to reset it.
To access kerberized services, you have to generate a new ticket with kinit.
Example:
$ kinit operz@CORALCMD.NET
Password for operz@CORALCMD.NET:
After generating a ticket, you should be able to log in via SSH when you pass the -K option:
ssh -K username@coralcmd.net
In this command for macOS (Or Darwin), you can mount your home directory over Kerberized (krb5p for privacy) NFSv4.
sudo mount_nfs -vv -o sec=krb5p,vers=4,acl coralcmd.net:/home/username /mnt
Each user is additionally allocated 10GiB in their AFS volume. You need your Kerberos passwrod to access this.
From CoralCMD’s UNIX shell, type:
afs
And you will be granted an AFS token upon entering your password. Navigate to /afs/coralcmd.net/users/$LOGNAME to access your directory. It is private unless you add permissions for others, which is out-of-scope for now.
If you wish to access it from another machine, such as Windows, download the AuriStor OpenAFS client and install it. It is located here.
Next, you’ll also want MIT’s Kerberos for Windows.
In most cases, you can initialize a Kerberos ticket then get an AFS token form that via the following two commands:
C:\Program Files\MIT\Kerberos\bin\kinit.exe username@CORALCMD.NET
C:\Program Files\OpenAFS\Client\Program\aklog.exe -d
Then in file explorer’s address bar, navigate to \\afs\coralcmd.net\ and then you have your AFS directory on Windows.
Users may access a virtual Debian Linux instance running under the illumos kernel, via a compatibility layer known as LX Zones.
To log in to this instance of Debian, simply type debian at the shell and then type in your password.